How to Plan a Last Minute May Day CelebrationLast Thursday, we had our very first May Day celebration. I wasn’t sure how’d it turn out with the whole concept being new for everyone, but we ended up having a lot of fun and after a week of crummy weather it was sunny, warm and breezy. Perfect for a party.

A week before the party day, we sent out invitations to our friends and started planning our May Day festivities.

The day before the party the boys helped me prep some of the food by washing and cutting the fruit and making sandwiches. We made Strawberry Sandwiches with strawberries and strawberry cream cheese and Cucumber Sandwiches with chives and onions cream cheese, turkey slices, and cucumbers. We kept the food simple with sandwiches, a fruit bowl, salad, store bought cookies, water, and pink lemonade. Our friends brought along a few other tasty treats.

My parents live on about 15 acres, so whenever we have outside parties they happen there. The kids have plenty of room to run and play. To pass the time we took a short hike in the front yard to find our May pole.

We had a little table with a basket of May day flower clips for the girls and laurel crowns for the boys, which they all happily wore. One of the older girls helped me make paper cone baskets (we used this tutorial), which we used to fill with flowers on our hike.

I wasn’t sure if the May day pole would work out. I made it with two circular pieces of styrofoam sandwiching the ribbons between the two pieces with hot glue. Then I picked some flowers from my parents garden to cover the styrofoam and then placed it on our pole. We tried a simple over/under pattern, but with the variety of ages that didn’t work out so well. Once the littler kids lost interest, a few of the older children were determined to figure it out. They ended up just walking around the pole until the ribbons covered most of the branch.


After eating and dancing around the May pole we took a hike in the woods. We took our May day baskets to gather wildflowers, though most of the boys ended up collecting sticks, dirt, and rocks.

Last, we picked our May Day queen. Each girl had their name in the basket and the oldest boy randomly picked a name. The girls were all very excited.

After all our friends went home, we left May Day baskets on the doors of our gracious hosts and our great-grandparents.

All in all, it was a fun day with beautiful weather and even more beautiful children! I’m thinking about making it a tradition.

Did you celebrate May Day—now or growing up?

0 comments

May Day

My friends know me as the dreamer. The one who sends texts that start off with “Okay…so ya’ll know I’m full of crazy ideas” and then invites them to a May Day party that birthed an hour earlier. Some of them had never heard of May Day.

Honestly, I don’t really know much about it other than my childhood memories of dancing with ribbon around the may pole and wearing flowers in our hair the first of May in primary school. But spring, flowers, and fun—sounds like a great reason to have a party, right?!

I love any excuse to throw together a party and wearing flower crowns is just an added bonus. So…this week the house of Mule is planning our very own May Day celebration.

May Day is a spring festival celebrated on May 1st in many European countries. It was originally birthed out of pagan religions, but with the spread of Christianity in Europe it became a more secular festival over the centuries as a celebration of spring. It’s now known for dancing around the may pole, crowning Queen of the May, and anonymously delivering small baskets of flowers or sweets on friends and neighbors doors.

Our May Day Celebration

After that quick text, I made May Day invitations and the boys picked flowers from the backyard to put in the envelopes, then we mailed them off to our friends.

A Simple Meal

We’re having our party mid-morning into lunch, so we’re going to have simple sandwiches, fruit, lemonade/water, and dessert.

Flower Crowns

I bought a silk flower bouquet from Hobby Lobby, cut the flowers off, and made flower hair clips for the girls and used the leaves (along with floral wire and tape) to make laurel wreaths for the boys. Though I have a feeling the girls just might enjoy theirs more.

May Day flowers

May Day Baskets

At the party, we’ll make paper May Day baskets and fill them with fresh flowers to deliver to friends and/or neighbors.

May Pole

We’re going to attempt a May Pole. If we can get it to stay up, perhaps we’ll attempt dancing around it. I’m imagining with the variety of children’s ages that will be the hard part, but then we’ll just have a pretty centerpiece.

Crowning the May Queen

During our festivities we’ll crown one of our young ladies the May Queen. To be honest, I’m not sure how the May Queen is chosen, but we’re going to be approaching it by drawing a name out of a basket.

Other Ideas for May Day

If you planned your May Day celebration a few weeks (or months even) in advance, I think it’d be sweet to have children recite poetry they’ve learned, play or sing a song, or even present a dance. It’d be a fun idea for friends or homeschool families to get together, celebrate spring, and showcase their talents.

Looking for more May Day ideas? Check out my Pinterest board.

Have you celebrated May Day before? What’d you do?

I’d love to hear any plans you have or stories from past May Days.


Photo Credit

1 comment


Easy Ways to Create Art with Kids

I like making stuff. I’m kind of a crafty person and I want my children to be able to create with me. They can’t always follow at my pace or skill level, but I want them to see art and creating as a skill within their capability. Not just a skill, but a means of expression. I want them to have the freedom to try new things and to create when the impulse strikes.

But, of course, kids and art supplies aren’t always easy. Pink play dough gets stuck in the carpet, scissors left within little sister’s reach, the table gets painted, the kids tattoo themselves with markers, crayons get bitten, and the walls colored. Construction paper litters the floor in teeny, tiny pieces and nobody wants to clean it up.

All of which (and more) have happened in our house. Just this morning we were painting with watercolors, I left to use the bathroom and came back and two of my children had painted their faces!

Why, if there’s such a huge potential for mess, would I encourage you to let your children create? 

It’s fun. They get to use their imagination and build their fine motor skills. They’ll have the chance to make something, to complete a process from beginning to end. It’s a chance for them to exercise their independence and grow within safe and loving boundaries with support.

Easy Ways to Create Art with Kids

How can creating art with kids be easier for you?

1. Keep art supplies at their level. Let them have regular access to art supplies (paper, crayons, colored pencils, etc) and not have to ask for everything they need. Equip them with the tools they need and foster their independence by allowing them to get their own supplies.

We don’t keep all our art supplies out. Since the age range in our house is 18 months to 5 years, it’s not safe or wise to give equal access to everyone. Markers, scissors, glue, tape, and glitter are kept out of reach. They can ask for them, but I don’t leave them out at all times, because of past misuse/waste and the potential danger. Hello, scissors.

2. Do it with them. I love creating and one frustration I found in parenting was not having time to do my painting, cross stitching, collaging, etc, but if I do little bits of it with my children not only do I get to enjoy creating, but I’m bringing them along with me and they’re seeing me create. It shows them that art isn’t just an activity to keep kids occupied and out of the way, but something for everyone to partake in and enjoy.

3. Know your limits. What will you allow at their level, how messy are you willing to let the environment get–attended and unattended. Create the boundaries and be okay with the mess that happens.

4. Reuse! Reuse! We save old tin cans, egg cartons, cereal boxes, toilet paper rolls, and empty tape rolls for kids to invent their own creations.

5. Don’t demand for perfection. It’s one thing to encourage children to improve their skill, but creating art with your children shouldn’t hear the theme “that’s not right.” Allow them to scribble even if it’s frustrating (it improves their pencil grip and prepares them to write), have them reuse paper if there’s only a mark or two, ask them what they’re drawing or how’d they make it. Ask questions that don’t have yes or no answers.

If you’re looking to improve their skills in drawing, painting, etc. set aside a time to have a lesson apart from their usual free creating time. You could approach it by saying, “I really notice you like using the watercolors, would you like to learn some other ways you can use them?” or “You’re really improving in your drawing, would you like to use this drawing book with me so we can learn some new things together?”

Easy Ways to Create Art with Kids

Need some inspiration? One of my favorite art parents is Jean Van’t Hul of The Artful Parent (find her on Pinterest). You can also find some fun art ideas for kids on my Pinterest board, Art for Kids.


What are some of your favorite art projects to do with kids?

0 comments

10 Ways to Welcome Spring

We’ve been feeling the coming of Spring for a few weeks now–baby chicks, unseasonably warm weather, and open windows. The cherry blossoms are beginning to bloom and our bird friends have been making their way back to our yard (not the chicken kind).

Around here spring is welcomed with open arms and bare feet.

10 Ways to Welcome Spring

1. Read outside. We love reading and with Spring’s warm sun peaking through the trees, casting shadows all around it seems the perfect time to take a literary adventure. Not everyone stays to listen, but it’s fun just the same.

10 Ways to Welcome Spring

2. Have a picnic. Eating outside on a warm day with a light breeze is one of life’s simple joys. We ate dinner outside one night last week and while there was good food and beautiful weather, my husband and I had to switch off and on chasing after little Olivia. She loves to run…mostly toward the driveway and street. It wasn’t an idyllic picnic, but you just roll with it and have fun. {Two years later, and “little Olivia” asks for a picnic every day. :)}10 Ways to Welcome Spring

Just watch out for the chickens!

10 Ways to Welcome Spring

3. Get planting! Plant bulbs, seeds, or seedlings. Or all three. If it’s still too cold to plant outside, start seedlings inside. When our babysitter went on Spring break, we got to babysit her plants and in one she had just planted seeds. I forgot how much fun it is to watch them sprout. In just a week’s time they went from seed to a few inches tall! It makes me want to plant seeds in glass, so we can see the process.

10 Ways to Welcome Spring4. Buy a bouquet of flowers to decorate your table. I love flowers. I could have them always and always. About half way through the winter gloom I started making room in our grocery budget to buy a bouquet of flowers every week or so. It’s amazing how such a small, simple change can brighten your day and mood.

10 Ways to Welcome Spring

5. Hang or make a bird feeder. We live in South Carolina and don’t see much snow, but we did have one good snowfall of nearly a foot this winter and it brought out all the birds. We had a suet feeder hanging for a few months, but with the snow a variety of birds we hadn’t seen before started visiting, from Carolina Wrens to Chickadees and Cardinals to Red-Bellied Woodpecker and a Ruby-Crowned Kinglet. They just kept coming and coming. Now that they know we’ll feed them, many still visit regularly and we’ve become a little bird watching family.

10 Ways to Welcome Spring

6. Plan a children’s garden. We’ve set aside a section of our yard as the Children’s Garden. We’ve marked it with bricks laid in the ground, and there’s a little child-size bench my dad made, an old shelf we painted together and use as a planter. My parents live on a bit of acreage and brought over logs, tree stumps, and a few large rocks. The kids dig for dinosaurs (Joey’s determined there’s got to be some fossils in our backyard), build together, and take care of their flowers. I got a pinwheel from Hobby Lobby to greet the front of the garden. We have plans to make a natural tic-tac-toe board as well as hopscotch (and possibly a sandbox).

7. Make tin windsocks. One of the decorations we added to the children’s garden was hanging tin windsocks. With lots of Mama’s help, we used a hand drill to drill holes in a tin can and then loped twine on the top to hang it from the branches and tied colorful ribbons (of their choosing) in the holes around the bottom of the can. {These eventually rusted and the string worn too thin and they fell. 🙁 But, they brought a nice bit of color. Last year, we made a shell wind chime and every once in awhile we find wrens perching on it.}

8. Paint outside. What could be easier than painting outside? If you’ve got a bit of grass there’s no mess to worry about! It’ll get cut or wash off with the next mow or rain. We’ve painted old cardboard, wood, rocks, and paper. If you’re in an apartment, perhaps take some watercolors and paper to the park.

10 Ways to Welcome Spring

9. Go on a nature walk. My kids love playing outside and going on adventures. Before Joey learned to walk, my husband and I would put him in the baby carrier and go on nature walks in our local parks. We’ve called them adventures from the very beginning, so now we’ll take the occasional drive to my parent’s land and go on an adventure in their woods. It’s nice to let the meander along at their own pace. The boys now take along their “adventure boxes,” small wooden chests my mom gave them, and fill them with all their findings–rocks, bark, leaves, etc.

10 Ways to Welcome Spring

10. Stare at the grass to see how many insects you can find. This was one of my favorite things to do as a kid when the weather was warm. I’d lay in the grass (or on a blanket) and stare into the grass to just watch all the little creatures. Otto and I did this recently and he said, “I don’t see nothing!” but the secret is the longer you wait and sit still them more clearly you’ll see and then you’ll find more and more little creatures. {Or maybe, stare at the clouds and see what shapes you can find.}

How do you enjoy Spring?

0 comments

This post contains affiliate links which means if you make a purchase through the link it supports Our Montessori Home. 

The Montessori Pink Series: With Step-by-Step Pictures

When Joey first started showing readiness for the pink series is seemed a maze to sift through. I’d read different approaches to the series that also varied from the way it was done in the school I worked at. After scouring the internet with a mix of trial and error and too many broken links, I managed to make my way through the pink series sequence. Now that Joey has moved onto the blue series (yay!) and Otto is beginning the pink series,  I feel comfortable in our approach.

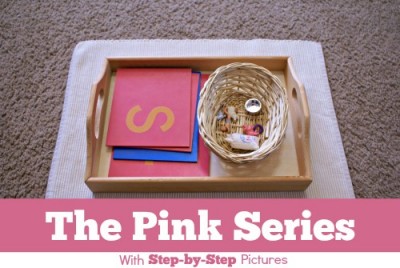
But to make it easy for you who are on the hunt for a Montessori approach to reading, here’s the pink series in pictures. If you’re looking for resources for the pink series, you’ll find them at the bottom of this post.

Montessori Pink Series: Sound Baskets

Using the 3-period lesson, we begin by matching objects to the sandpaper letter with its corresponding beginning sound. I divided our letters into six different baskets: c m a t, s r i p, b f o g, h j u l, d w e n, and k q v x y z.

1st Period (Naming): This is b (buh).

The lesson begins with telling the child, “This is…” while saying the phonetic sound and tracing the sandpaper letter. Then ask the child, “Can you say…” and have them trace the sandpaper letter.

(It’s important to note to teach the sounds first, then the names. Why? The letter is only a symbol without the sound. If a child names the letter you can respond with “b says buh” or simply repeat the first period of the lesson, “This is buh.”)

2nd Period (Recognition): Can you show me b (buh)?

The next step in the lesson is to ask the child, Can you show me…?” If the child points to the correct sound, proceed to the next period. If the child gets it wrong, instead of saying “No” you might repeat the question, Can you show me…? If the child still says the sound incorrectly begin with the first lesson again, This is…” clearly stating the sound and tracing the letter.

3rd Period (Recall):

The final step in the lesson is recall. Point to a sound and ask the child, “What is this?” The child should answer with the correct sound. If you’re pointing to c and they say a then point to a and say “This is aa. [Then pointing to ‘c’] What is this?” 

If the child responds correctly, continue with the other sounds. If not, then you may need to come back to the lesson at another time. While the baskets are grouped with 4 to 6 sounds, it’s not necessary to present all the sounds in a basket in one lesson. Start with 1-2 sounds and add more as the child is more comfortable with the lesson and shows readiness.

Montessori Pink Series: Object to Beginning Sound

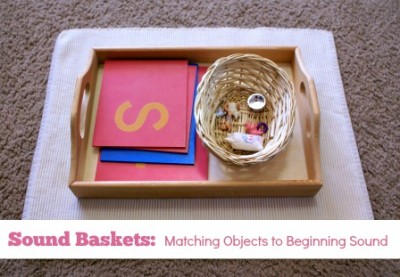
Once you’ve presented the sounds to the child (and depending on the child’s readiness and attention this may be a lesson for the next day), you can have them sort the objects. Pick up an object and name it or ask the child, What is this? if the child gets it correct ask, Where does cat go? or What sound does cat start with? 

Note: When picking objects for sound baskets, be careful not to pick objects that begin with blends which can be confusing for the child who is trying to isolate the beginning sound. Some examples are tree, trunk, drum, church.

Montessori Pink Series: Matching Picture to Beginning Sound

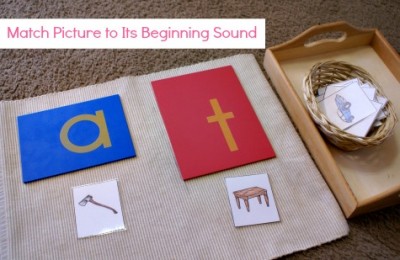
As the child becomes more familiar and confident with the beginning sound baskets, you can introduce picture cards to match with their beginning sound.

Montessori Pink Series: Object with Moveable Alphabet

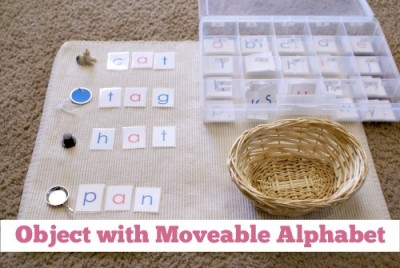
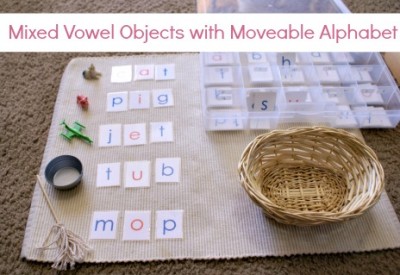
After the child has mastered the sound baskets, you can move on to building words with the moveable alphabet. Make sure the objects you choose follow the consonant-vowel-consonant (CVC) pattern and are short vowel words. Once the child has completed each vowel with objects + moveable alphabet, you can give them a basket of mixed vowel objects to build.

Montessori Pink Series: Mixed Vowel Objects with Moveable Alphabet

By this point, the child should not need a 3-period lesson for the remaining activities in the pink series. If they are able to pronounce the sounds clearly, they should do fine with a short instruction on how to do the activity.

Picture Card with Moveable Alphabet

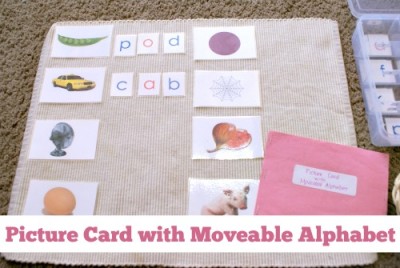
Here we’ve moved on from using objects to build words with the moveable alphabet and now the child is using a CVC picture cards to build words.

Montessori Pink Series: Matching Object to Word Card

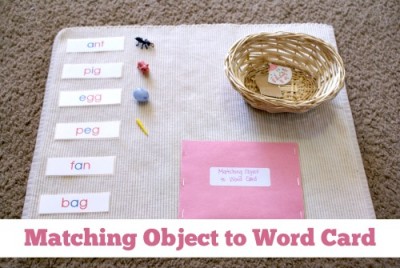
 From there, we move onto matching objects to their corresponding word card.

Montessori Pink Series: Matching Picture to Word Card

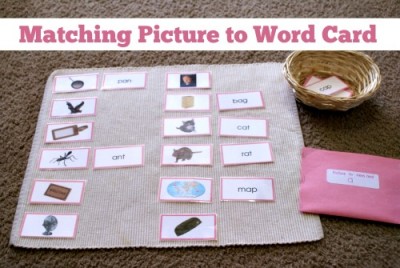
Now that the child is more confident in blending and reading CVC words, the next step in the series is matching pictures to their word card. They are 6 different baskets for this activity, one for each vowel and then a mixed vowel basket.

Montessori Pink Series: Mixed Vowel Picture Mat

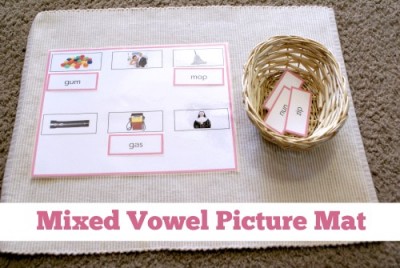
The child continues with matching word cards to their corresponding picture with the mixed vowel picture mats. There are six mats in this series.

Secret Word Slips

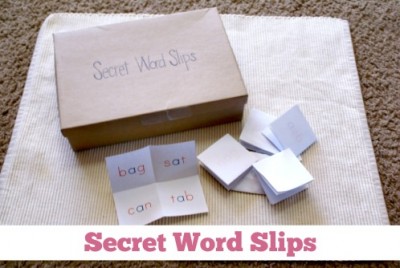
Secret Word Slips is where I feel Joey gained his confidence in reading. The box contains about 10-15 folded pieces of paper with CVC words written on them and folded in half.

The child opens the box, pulls out one slip and quietly reads the word. (If there are more than one word, the child picks one word.) After the child reads the word quietly to themselves they secretly whisper the word to the teacher. Joey thought this was the best part and I was surprised at how such a simple activity intrigued him and how quickly he was able to pronounce words he’d never seen before.

Note: In my reading, Secret Word Slips seem to be done two different ways. One, as pictured, with 4 words in the corners on one slip of paper. The other way was only one word per slip of paper and the slip folded in half.

Montessori Pink Series: Reading Phrases

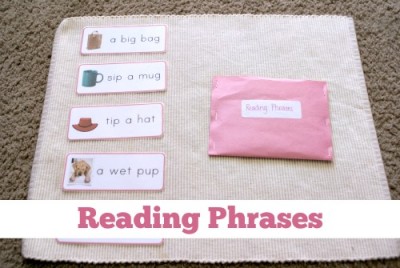
After the child has worked with the word slips for awhile, you can move on to reading phrases. This is really to get them comfortable with reading words together and readying them for their first book.

Pink Series Word Lists

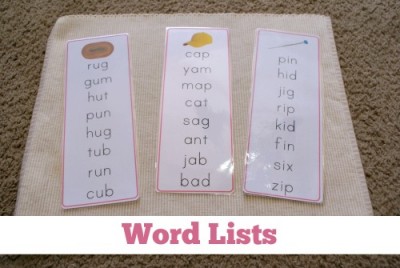
 For some more practice with CVC words, the child reads word lists.Montessori Pink Series: CVC Sentences

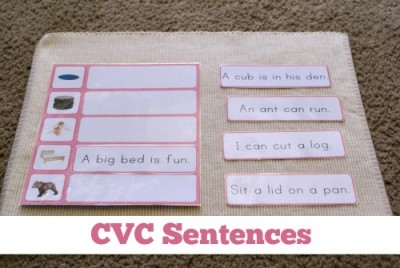
Once the child is comfortable with reading phrases, you can move onto consonant-vowel-consonant sentences. These are short sentences with CVC words and a few sight words. We explain sight words as words that don’t sound the way they’re spelled. Because, English. In this activity the child is matching the CVC sentence with it’s corresponding picture.

CVC Reading Books

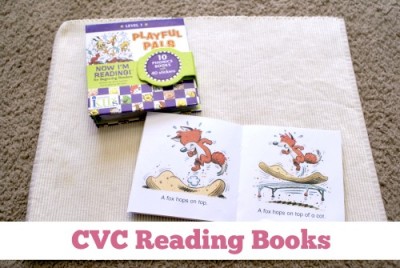
 After all that practice with building, blending, and reading words, the child is ready for their first book! This is quite a milestone and fun to see them make the connections and realize that they are really reading. For our CVC books, we used Playful Pals – Level 1 by Nora Gaydos. We only used the first 5 books for the pink series, since they are made up of mostly CVC words. The remaining books work on consonant blends, diagraphs, and word endings. In a few of the short vowel books there is one word ending (-s) that threw Joey off guard, but simple enough to introduce.

Pink Series Resources

Alright, so you know what to do, but now where can you find what you need for the pink series?

Pink Series Printables – The Montessori Print Shop has the pink series printables available as individual and bundle downloads for purchase. We used the Montessori Print Shop download from the picture cards to the mixed vowel mats.

Later, I found The Helpful Garden has a beautiful set of free downloads all  with real pictures for the pink series, which we used for the rest of the series. (On The Helpful Garden’s site the previews on the pink series download page don’t show up, but if you click the picture icon it will still take you to the pdf.)

Moveable Alphabet – I’d really love to purchase a wooden moveable alphabet. They’re a beautiful tool in the classroom. You can find a moveable alphabet from most Montessori materials suppliers. Montessori Outlet is where we’ve bought most of our Montessori materials and is a company I trust the quality.

I made ours in a Word document. I made a table and used the font I wanted, making the vowels red, then I printed, cut, and laminated them. (So…full disclosure…I just realized I swapped the colors on the moveable alphabet. How I did not notice this until now??? Embarrassing. Okay. The important thing is to isolate the vowels.)

Moveable Alphabet Box – I bought a embroidery floss container from Hobby Lobby. It doesn’t have 26 compartments, so a few letters share a space. I labeled these so that it would be easier to find the letters that share space.

Language Objects – We invested in the Language Object Starter Set set from Montessori Services. We’ll use them throughout our language series. If there’s a word I need that’s not in the set, I can usually find it in our house.

Picture Cards for the Sound Baskets – I downloaded The Helpful Garden’s sheet for pre-reading beginning sounds, colored, cut, and laminated them.

CVC Books – Playful Pals – Level 1 by Nora Gaydos on Amazon.

Baskets & Trays – Hobby Lobby is great for these.

Mats – We use regular, old placemats. These, I believe, are originally from Target.

19 comments
//Track outbounds